Friday, July 26, 2013

How to make an UGLY space pretty...CHEAPLY

I must apologize for not posting in some time...but I got so excited over a recent project, I just had to share.  I wish I had before pictures of the light on my landing (you know, that unused space between flights that you're always wondering what to do with), but I do not have pictures, so you will have to trust me when I say that the light was a hideous thing straight out of the 70s.  Anyway, my mom and I tackled it today.  It all started because I bought a "Starry Night" panel from a yard sale.  It was $15 find; a former dorm room piece, a room divider.  I had no idea what I would do with it...I just knew I had to have it.  I mean, it was 15 bucks ($20 actually, but she took $15)  I couldn't let it sit under a horrible light!  It had to go.  We started with the panel.  I unscrewed the very old, weak joints and mounted it on my wall.  I have to say, the thought of it would never have occurred to me, but my mom took one look at this thing and knew.  I let it sit in my foyer for weeks.  I looked at it a hundred times.  Finally, I asked momma...  Here is what we came up with-


After I hung my art (they are doors to a trifold room divider), I took off the awful light fixture cover. The my mom and I stood they and stared at it.  We brainstormed, and my mom mention rice paper.  SOOOO we went to my craft room and started digging.  I ended up using a piece from a wallpaper sample book my girlfriend gave me.  So we fixed that ugliness with a piece of paper!!!   It looks fabulous! See that!?  WEEEEEEEEEE!!!!!

THANK YOU MOMMY!!!!!!!!  I really wish I had a before pic...you have nooooo idea what an improvement this is!

Tuesday, February 5, 2013

Rag Ruggin' 2

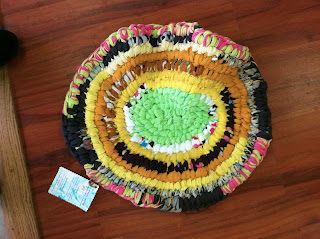
Okay, so I am obsessed with rug making.  I think most people can relate.  You take an interest in something for awhile....who knows how long it will last.  Probably until I find the next thing.  In any case, it is cathartic.  Being a high school teacher, I am used to making multiple decisions in a matter of minutes.   Multitasking.  That is how I survive my job.  Making rugs is nice for me because I don't really need to use my brain.  I just do it.  No thought; and I like that.  Anyway, I have been selling them at my pet store (yep...my hubby and I have a pet store) as rugs/beds for dogs and cats.  I am thinking of trying to make enough to open an Etsy store...I don't know-


As you can see, I am having fun doing it!  


Sunday, February 3, 2013

Rag Ruggin'


So I have been on a rug kick lately.  It's a bit addicting.  It's awesome because I am creating beautiful rugs while repurposing old clothes, sheets, curtains, etc.  I originally got the idea from Sugar Bee Crafts Blog.   I also love an activity I can do while hangin' with my kids or watching TV...keeps my hands busy without much though, ya know?  So I begin my experimenting with a simple crochet stitch style rug.


This project has actually translated into selling these as pet rugs in our pet shop, Dart Frogs To Dogs.  My mom's dog enjoys lounging by the fire.  MUST BE NICE!  Due to their popularity, I have also begin selling them on EBay.


The above pictures are miniature braided rugs for dollhouses.  Of course, if you check out my Barbie House post, you will see that my daughter is real into it right now.  She just loves these little area rugs.  Some of these are listed on EBay as well (I am the bestnest11)...but I need to hide them or she would take them all!

I then began to mess around with braided rag rugs of a bigger size.  These take longer because I need to hand stitch the braids together, but they are awesome.  Needless to say, my family got a lot of rugs this Christmas!


I am enjoying experimenting with different colors and textures.  You never know what will happen!


Monday, December 17, 2012

Terrible Table Turned Terrific

A lot of furniture in my house is there thanks to my mom.  Seriously.  If it weren't for her, my home furnishing would be almost non-existant.  This table was one of the things she passed down to me.  It is an old table.  The beading detail is what I really like!  


You can see in the picture below that the entire top was lifting off.  I pealed up some of the loose wood, but when I felt resistance, I let it go.  I didn't want to damage the table further.  I had to do A LOT of sanding, which I hate, hate, hate.  

Below is a nice upside down shot of the table.  (I have no idea).

After a whole lot of sanding, I painted the table with some white paint I had on hand.  I wanted to keep the table "old looking," so after I was done I worked on distressing.   I took some fine sandpaper and ran it along the edges and the beading.  The pictures don't really show this well.  I just did enough to make the edges look worn.


Now for making the table truly special and unique.

Every year since my oldest was one, we have gone to the beach in the summer.  On these trips, one of our favorite things to do is collect pebbles on the beach.  We spend hours doing this. After a day on the
 beach, we would go through our findings.  Our treasures.  Well, that gave me the idea for this table.  It was the perfect way to save these treasures we found.  I took all the pebbles we brought home from our trips and picked out the prettiest stones.  I meticulously placed them on the table and used Mod Podge to glue them down.  This took a looong time.  


After I completed that step, I poured Castin' Craft Clear Polyester Casting Resin over top of the table.  It was super easy to do.  It gave it a wonderful underwater look.  

TA DA!  I love the result.  It was worth the time and effort.  More importantly, I was able to save memories too!


Saturday, December 8, 2012

DIY Mirror Redo

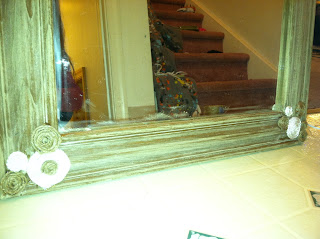
Christmas time!  I am making all sorts of things for the holidays.  One really cool present came from a thrift store trip.  I saw this big, heavy mirror.  I knew it had potential.  I didn't take a before picture (hmph), but trust me when I say it looked ROUGH.  I sanded it down.  And sanded it down.  Then I sanded some more.  I grumbled the whole time.  I do so hate to sand things.  Anyway, in the mean time I had a DIY stain brewing.  I poured some vinegar in a big coffee mug and added some pennies.  After a few days I started to see the vinegar change color; but only slightly.  Day four-it was ready.  I put lots of stain on this mirror and I just love the color I got!!  It looks fantastic; sort of a blue/brown thing going on.  Then I hot glued some twine and rope spirals to the front.


I like the contrast of colors and textures.


BARBIE POST #1


So, I decided to make Emi a Barbie house.   What fun it has been!  It has taken a lot of planning and imagination, but it is slowly starting to come together.  Yeah me!  Unfortunately, I have not been taking too many pictures along the way.  I thought I would start to put it together in this blog post.  I will need to revisit this topic though.  THERE IS SOOOO MUCH!   I will post as I work from now until Christmas.  I started with two bookshelves I got for $5 a piece at a yard sale.  Lovin' it.  I have been waiting for an opportunity to use them creatively.  And so it began.  I started to look at things in a new way; miniature.  I scouted for things I could turn into mini-household decor, etc.  I am having a blast.  Haha.  


This cute little chocolate tin became a coffee table with storage.  

I glued marbles  on for feet.

I put a little decoration on there; a few stickers and beads.


This is an early view of one of the bookcases.  I used duct tape on the floors.  Scrapbook paper for the bottom half of the walls (the pretty wallpaper), and tissue paper, a lot of patience, and Mod Podge.  I really like the effect I can get with tissue paper.


 On the second shelf I used a crocheted piece of blanket (I never finished it) as carpeting.  I used green tissue paper on this level.  I like the contrast with the purple.


This is the bathroom/changing area.  That black thing is a shower stall.  I used cardboard and duct tape. I glued a bead and string on the side for a latch.  I then glued it to the wall.  I like the striped craft paper in this room.  It has a loooong way to go!


On this floor I used a piece of an old, fuzzy shirt as carpeting.  Cute!

MORE TO COME!!!!


Sunday, October 21, 2012

Repurpose an old table with beach pebbles...and distressing

It has been awhile since my last post.  Since my mom and I have no following right now, I guess it doesn't matter!


I have always been a fan of beachy things.  I like to be creative with shells and pebbles; especially when my family is the one collecting them!
This bag for collecting shells and such will be in another post!


Our goal on vacation this year  ( okay, MY goal) was to collect as many pebbles as I could.  My husband and kids get VERY into it.  After a day at the beach, we would come back to our place and go through our treasure.  It has become a family tradition, and this year we took it a step further.

My son also caught fiddler crabs!


Prior to leaving for vacation I worked on fixing up the table I intended to use.  This was a task!  I peeled some wood off the top.  I painted it with some paint I had laying around.  Then I did my first distressing job.  I like how it turned out!

This is what the table looked like before the project.


Although you can't see the distressing and paint job, you can see how the top turned out.  I used Mod Podge to secure the pebbles and shells to the table.  My daughter enjoyed doing this with me.  We carefully placed each one.  I then poured on some resin.  The effect is awesome.  It looks like you are looking under water!